2/26/2010
attention please!
so you will find my new stuff on / date le numerose richieste raccolte di semplificare il nome/indirizzo del blog, ecco che tutto il materiale vecchio e nuovo lo postero` da ora in avanti sul seguente account/
http://thelugh.blogspot.com/
8/05/2009
for the next exibition
7/08/2009
NEXT EXIBITON
3/28/2009
solo exibition
11/05/2008
EQUILIBRIO
EQUILIBRIO - dietro le quinte-

Step two:
Define the first lines and general shape.


terzo passo:
taglio della lastra di ferro
Step three:
Cut the iron plate.


nota:
ho lasciato la superfice del taglio grezza e naturale avendo solo cura di martellare per smussare le zone potenzialmente pericolose.
Note:
I kept the cut's surface natural and crude as much as possible, just hammering to smooth some areas where there was a potential risk of injury.
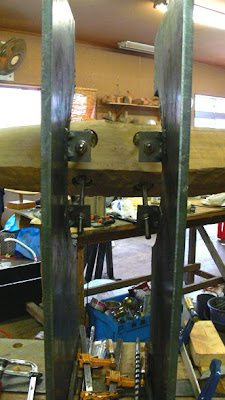
Check the proportion between wood and iron, and then determine the correct height and distance of the wood from the iron. Then calculate the correct angle for the four supports for the screws, which start in the iron and penetrate into the wood, which will hold it in the air.

era necesario giusto una struttura sufficente a tenere in piedi, alla stessa distanza e facilmente smontabili le due lastre di ferro dato che il peso in se le avrebbe fermate a terra, inoltre, esteticamente, la base e`coperta da uno strato di ghiaia presente nello spazio dove sara` esposta.
about the base:
it was enought have a structure to hold and keep standing the two iron's plates at the same distance and simple to setting for their wheigtit's enought to holding on the ground and aesthetically too there was not need to do more for will be cover by a layer of gravel.
Quinto passo:
la parte piu` pericolosa! (se in questa fase qualcosa non va come dovrebbe ...meglio non preoccupiamoci ora!) Determinare le angolazioni esatte delle quattro viti e da qui l'angolazione dei fori nel legno. Le viti dovranno essere tutte parallele tra loro o al massimo a coppia.
Passaggio particolarmenete difficile in quanto non ci sono dei punti di riferimento materiali, solo la mia idea ed il margine di differenza delle angolazione delle viti in cui devo stare e`al di sotto di 5mm. Per questo ho costruito una struttura dove appoggiare e fissare il legno all'altezza, distanza ed inclinazione volute rispetto alle pareti di ferro.
Step five:
Now comes the most complicated part...(if something doesn't go as according to plan..... better don't worry about it) Calculate the angles of inclinations for the four screws and therefore for the holes in the wood. It's quite difficult as the screws should be almost parallel to each-other therefore the range of the difference among the screws's axes in which I have to stay in is about 5 mm or less, otherwise one or more screws cannot go into the wood; to do this I made a structure on which I anchored the wood at the necessary height, distance and inclination, and clamped it to the iron's plates.
... bene...fatti i fori nel legno alla giusta angolazione e fissati i tasselli dentro. Ci siamo quasi... ora vediamo....
good... all the holes in the wood are at the correct inclination and the raw plugs are in the correct places. We are almost there... let's see.....
sembra funzionare !
It appears to work!
Now that I have done the "technical" part I can put the finishing touches on the wood with oil.


back/top/left
parte inferiore/anteriore/sinistra
bottom/front/left


